

How to Achieve the Look you want without Plastic Surgery
How to Make Your Nose Look Smaller without Plastic Surgery
• 1
Use your darker shade of foundation or powder and apply it to both sides of your nose. This will work particularly well if you have a wider nose and want to make it look slimmer. Blend the darker foundation or shadow toward your cheeks and blend to remove any telltale lines. Apply the lighter shade of foundation or powder to the bridge of your nose to highlight the thinner part. This will make your nose appear thinner and smaller.
• 2
Apply a sheer foundation all over your face, and blend carefully. Make sure to adequately cover all spots, freckles or discolorations. Then dust bronzer lightly all over your face, particularly your cheekbones and the bridge of your nose. This will smooth out all noticeable imperfections and make your nose appear smaller as well.
• 3
Play up your eyes with eyeliner on your upper lids and lots of mascara. Using makeup to accentuate your eyes to direct people's attention toward your eyes and away from your nose. Makeup will also make your eyes appear bigger, which will automatically make your nose seem smaller.
• 4
Design a hairstyle that draws attention away from your nose. Outward turning layers or loose curls will direct attention outward so that the viewer is not narrowing in on your nose. Bangs should be avoided because they close off your forehead, and inadvertently draw attention downward and toward your nose.
• 5
Apply dark eye shadow on the outer corners of your eyes, and light highlighter in the inner corners. This will make your eyes look farther apart and draw attention away from your nose. It will also make your nose look smaller by comparison. Dust some highlighter on the bridge of your nose as well to minimize its appearance.
Wear oversize sunglasses as another way to make your nose appear smaller. eHow.com
Makeup Tricks to make Small Eyes Look Larger
Beauty is in the eye of the beholder. However, it is also found in your eyes. Your eyes are what most people notice first about your face. If you have small eyes then you may feel that your face doesn’t look balanced. To correct this problem you can use several tricks to make your eyes look larger and more attractive.
1. Sculpt Your EyeBrows
The first trick that you can use to make your small eyes look larger is to sculpt your eyebrows properly. To do this you will need a pair of tweezers and a plan. The shape that you are after will have a thicker end near the inner corner of your eyes, an arch over your iris and an ending point that is determined by a diagonal line from the outside corner of your eye to your natural eye brow line.
2. Mascara Trick
Another easy way to make your small eyes look larger is to use this mascara trick. When you are applying mascara apply the first coat to your entire set of eyelashes. Then add a second and third coat to the outside lashes. Make sure that you coat both the upper and lower lashes in the outside corner of your eye. Leaving the inside section of your lower eyelashes without mascara.
3. Eye Liner Trick
Eyeliner can also be used to create a larger looking eye. To do this you will want to completely line the upper lash line, however, you will only want to line the outside half of your bottom lash line. This will create an amazing open look to the eye making it look dramatically larger than before.
4. Eye Shadow Highlights
Eye shadow can be used to create a lot of different effects and looks. One of the effects that you can use it to create is the illusion that you have larger eyes. To create this effect you will want to use an off-white shadow to shade the inner section of your eye lid, and then use a pure white highlighter to brighten the inner most part of the lid even more.
5. Eye Liner Trick #2
In addition to using your eyeliner to open up your eye, you can also use it to extend your lash line to create the illusion that your eye is larger. To create this effect properly you will want to follow the lash line from the inside of your upper lid to nearly the end of the outer corner of your eye. However, before you reach the outside edge of your eye create a curve upward. This trick will not only help to create a longer eye shape, but it will also help you to create the illusion of a thicker lash line.
Lax.com
How To Make Lips Appear Fuller Right In Front Of Your Own Eyes!
Courtesy of: Oleda.com
Models were using this corrective make-up trick many years before “show business” started over doing, filling lips with silicone. Corrective lip make-up for fuller lips is not difficult to master…it’s a matter of know-how and practice. You will know how after you read this so all you need to do is practice a few times before you actually go out on the town with your new, glamorous lips.
HERE’S HOW
Lipstick – Lip Liner Pencil – Lip Gloss
Below you will find step-by-step instructions using model makeup tricks to achieve fuller looking lips. It is not difficult to master and can be very glamorous and alluring.
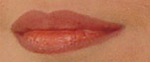
Pre-makeup lips

After simply using lipstick

After using 'fuller lips' technique
For beautiful full lips, here’s what to do.
How to make your lips appear very full…even if they are not:
1) Apply lipstick using your full lip line…blot lightly.
2) The consistency of the lip liner pencil is most important (our pencil has the correct consistency.) Make sure the pencil has a point. Then lightly blend the pencil color around your lips’ edges and into the lipstick, making sure to cover the full edge of your lip line…even going over the edge ever-so-slightly. Do not just make a dark line around the lips with your pencil….smudge or blend the two colors together so there is no line of demarcation between the lipstick and lip pencil. Do not put the lip liner color all over the lips. The trick is to have the outer part of the lips appear darker than the middle of the lips.


3) If you want/need to add more lipstick, now is the time to do it. You can apply a lighter shade of lipstick, if you wish. If you do, only apply it to the middle of the lips taking care not to go over or on the lip line itself with this second color…this would spoil the effect you have just made of having the lips darker toward the outer edges.

4) Blot your lips lightly…powder over lightly, at least powder the edges of your lips. The powder covers up your secret method of achieving fuller lips. Leaving a shine on the edges of your fuller lips makes your secret artwork obvious…the powder camouflages it.
5) If you like the subtle lip gloss look, now is the time to apply it. Apply it on the inside lower lip only . . .for a lovely delicate look. Do not apply it on the lip line…again it will expose your fuller lip secret!
Note: If your lips are too full or wide, you can follow the above information, but bring the lipstick and lip pencil just INSIDE the lip line.

Dealing with out Wrinkles....
Wrinkles may be a definite part of getting older, but we don't have to like them -- and we don't have to show them off either. With a few simple makeup tips you can hide those annoying lines and finally look as young as you feel!
Makeup Tip #1 -- Always start with a good moisturizer to help your foundation glide on smoothly. No matter what your age, it's still important to protect your skin from the sun, so choose a moisturizer that contains a minimum SPF of 15. Also, one with light-diffusing properties will make your skin glow and appear brighter and smoother.
Makeup Tip #2 -- Don't skip the foundation. Yes, it can get into the creases around your eyes and mouth, but only if you choose the wrong one. Pick a shade that matches your skin tone exactly and apply it lightly and evenly after your moisturizer.
Makeup Tip #3 -- As an alternative to foundation, you can also try a tinted or glowing moisturizer. They provide a touch of color that is easy to apply uniformly. And because it's not as thick as traditional foundations, you don't have to worry about it calling attention to any wrinkles. A tinted moisturizer will also save you time in the morning because it combines the moisturizing step and foundation step into one.
Makeup Tip #4 -- Another variation from cream foundations is a loose mineral powder. These tend to work best on normal to oily skin -- with dry skin; powder can sit on top of the skin and look unnatural. It's best to apply with a large brush or powder puff and go lightly.
Makeup Tip #5 -- Aging inevitably brings on uneven skin tones. If you have areas of darker pigmentation, try a product with hydroquinone, which is a lightening agent. This works by increasing the breakdown of melanin pigment granules in the skin's pigment cells that can even out your complexion.
Step one:
Start by using a good moisturizer as this will create a great base for your makeup to sit on, or even better, use a primer as it will help your makeup stay on longer.
Step two:
After you have applied your foundation base, grab a contouring brush, or a reasonably small blush brush. Suck your cheeks in (like you are making a fish face) and lightly brush bronzer into the middle of the hollow of your cheek, bringing it back towards the hairline.
Step three:
Relax your face Suck your cheeks in (like you are making a fish face) and lightly brush a pink or peach based blush over the apples of your cheeks (These are the bits that stick out when you smile).
Step four:
Using a soft makeup brush, lightly blend the products together to create a more natural look – you don’t want to be able to see distinct lines where the product is sitting.
Step five:
Grab a smaller brush (for accuracy) and dust highlighter over the very tops of your cheekbones to emphasize them. If you feel your face you can make out where your eye socket is – bring the highlighter upwards your temples from the bottom part of the eye socket. www.beautybible.co.nz
Things You'll Need
• Blush
• Highlighter (make up)
• Bronzer
• Several make up brushes
1.
o 1
1. Make sure you skin is clean and fresh. Using moisturizer will help to add to the soft, natural effect of the illusion.
o 2
Suck in your cheeks, as if trying to make a fishy face. Lightly brush highlighter (or lightly colored powder foundations) just above the hollows of your cheeks, right back to your hairline.
o 3
Next, maintaining your 'fishy' face, brush bronzer along the middle of the hollow of your cheeks, below the powder foundation bronzer.
o 4
Reverting back to a normal facial expression, lightly brush blush along the middle of the line where the powder foundation and bronzer meet, and over the apples of your cheeks (the top parts of your cheeks that bulge out when you grin).
o 5
Using a make up buffer (brush with thick bristles) lightly buff your cheeks so that the colors of the bronzer, powder foundation, and blush lightly blend together, to create a more natural look.
o 6
For a softer appearance, lightly sweep blush along your chin and on your temples.
eHow.com
Neck Care Tips
Your neck should be treated with as much tender care as your face. If you neglect your neck, it will show your age, no matter how marvelous your figure or facial skin is. It should be kept as clean as your face and the nourishing creams you use for your face should also be used for your neck.
Whenever you wash your face, wash your neck also. If you apply a foundation and powder on your face and neglect your neck, the result will be a sharp contrast between the two. Besides this, the neck needs some special treatment.
The appearance of the neck depends on the way you hold your head. The correct posture is to hold your head high, chin up and slightly forward. If you have a faulty posture, the result will be a double chin or flabby muscles.

A good carriage of your whole body, especially the back, affects the carriage of your head and shoulders. Very rarely does one find someone holding the correct posture while walking or sitting. A good posture adds to or detracts from your total image.
While walking, move from the hips only and allow the legs to lead the body. If you take shorter strides in the beginning, it will be easier to achieve a graceful gait. The easiest and perhaps the oldest way of learning to walk gracefully is to practice walking with a on your head. This practice will teach you to carry your head correctly.
Neck Makeup Tips
A clean, thin, long and slender neck is unique (or second to none) in the world of beauty.
The age effects appear on the neck first, hence maintaining beauty of skin of the neck will keep-up the beauty of the skin of the face. There is a saving in Australia that you can guess the age of a horse by the teeth and of a lady by the neck. The shape of the neck gives shape to the face. Jewelry also looks beautiful on a beautiful, long and slender neck. The fitting of the blouse at the neck is proper on a beautiful neck only. So never neglect it, at the time of make-up.
By applying light foundation on the front and dark one on the sides of the neck, if you have a thick one it will look thin. Let there be no extra fat on the neck, it will look thick and odd. Massage it with cold cream once a week. Move hands upwards while massaging. It is a useful recipe for dry skin. bestbeautyinfo.com
No comments:
Post a Comment